Numark 4TRAK


for VirtualDJ 8.0
Last Update : July 2016
 

SETUP


Step 1. Connections


Connect the 4TRAK with your computer using the provided USB cable.
Connect your speakers to the rear Master Output using proper RCA cables and your Headphones to the front socket.

Step 2. Drivers


Install the required drivers from https://www.numark.com/product/4trak
Available for both Windows and Mac

Step 3. VirtualDJ


Install VirtualDJ 8 from http://www.virtualdj.com/download/index.html (in case you have not done already)

Start VirtualDJ and login with your Account credentials.

A Pro Infinity or a Pro Subscription License is required. http://www.virtualdj.com/buy/index.html

Detection Window
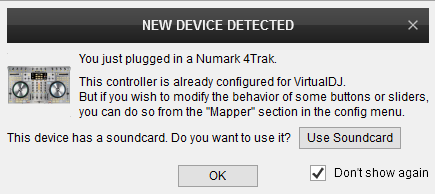
A detection window will appear when the unit is first connected with VirtualDJ.

Click on the "Use Soundcard" button so that VirtualDJ will apply the pre-defined audio configuration (speakers need to be connected to the Master Output of the unit)
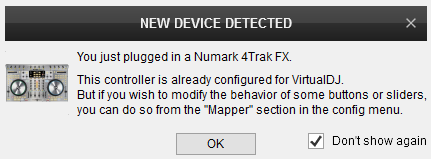
Click to OK


A 2nd detection window will appear next verifying proper connection of the top FX unit (detected as a 2nd device)

Click to OK


The 4TRAK is now ready to operate with VirtualDJ
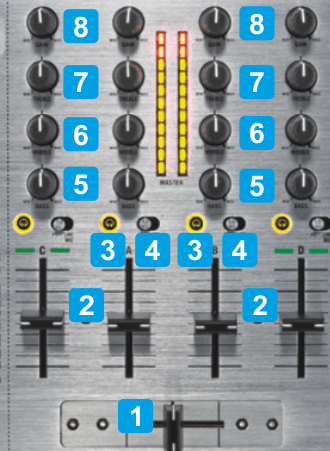
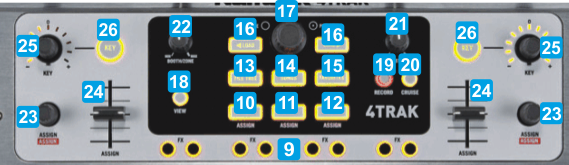
 

MIXER CONTROLS


KEY

ACTION

1 CROSSFADER
Blends audio signals from left and right decks
2 VOLUME
Adjust Volume Output of each mixer channel
3 CUE/PFL
Send the audio signal of a Mixer Channel to the Headphones Channel
4 PC/LINE
Define the source of each Mixer Channel. Set to PC to route a VirtualDJ deck to a Mixer channel. Set to LINE to route an analogue source (connected at the rear panel)
5 EQ BASS
Adjust the Equalizer Low Band frequencies (Bass) of each mixer channel
6 EQ MID
Adjust the Equalizer Middle Band frequencies of each mixer channel
7 EQ HIGH
Adjust the Equalizer High Band frequencies (Treble) of each mixer channel
8 GAIN
Adjust the pre-fader Output level (Gain) of each mixer channel


Notes
  • By default the mixer of the 4 TRAK will follow the 3-1-2-4 Mixer Channel order. A different mixer order can be applied either from the Mixer Options menu (right above the Crossfader in the 4 decks default skin) or from VirtualDJ settings (MixerOrder setting in OPTIONS)

  • The 4TRAK is a stand-alone mixer and can operate without any software running on computer
 

BROWSER, VIDEO & SAMPLER CONTROLS


KEY

ACTION

SHIFT (SECONDARY) ACTION

S SHIFT
Press this button down to access secondary actions as described in the SHIFT ACTION column
9 FX
Trigger Samples 1 to 8 from the selected Sampler Bank
Stop the playing sample
10 ASSIGN A
Select previous Sampler Bank
Select previous Sampler Trigger mode
11 ASSIGN B
Select next Sampler Bank
Select next Sampler Trigger mode
12 ASSIGN C
Show Sampler in Sideview
13 FILE TREE
Set focus to the Folders list. Open/close sub-folders if focus is in Folders list
14 SONGS
Set focus to the Songs list
Adds selected track to the Automix List
15 FAVORITES
Set focus to the sideview
Cycle through the Sideview windows (Automix, Sidelist, Karaoke, Sampler and Clone)
16 LOAD
Loads selected track to Left/Right Deck
Unloads Left/Right Deck
17 BROWSE
Scroll through folders or tracks
Push to set focus to the next Browser window
Search through the track playing in the Prelisten Player
Push to start/stop the Prelisten Player
18 VIEW
Toggles between Browser Zoom (with mini decks) and normal Browser views
Open the next Center Mixer panel (cycle)
19 RECORD
Start/stop recording
Open Record Config window
20 CRUISE
Start/stop Automix mode on the active deck
Start/stop Sandbox mode
21 MASTER VOL
Adjust the Volume of the Master Output
22 BOOTH VOL
Adjust the Volume of the Booth Ouptut
23 ASSIGN ENC
Left Side : Select a Video transition. Push to transition video between left and right assigned deck.
Right Side : Select a Video Effect for Master. Push to turn the Video Effect On/Off
Left Side : Push to open/close the FX GUI of the selected Video Transition
Right Side : Push to open/close the FX GUI of the selected Video Effect on Master
24 ASSIGN FADER
Left Side : Adjust the 1st Parameter of the selected Video Transition (if available).
Right Side : Adjust the 1st Parameter of the selected Video Effect on Master (if available)
Left Side : Adjust the 2nd Parameter of the selected Video Transition (if available).
Right Side : Adjust the 2nd Parameter of the selected Video Effect on Master (if available)
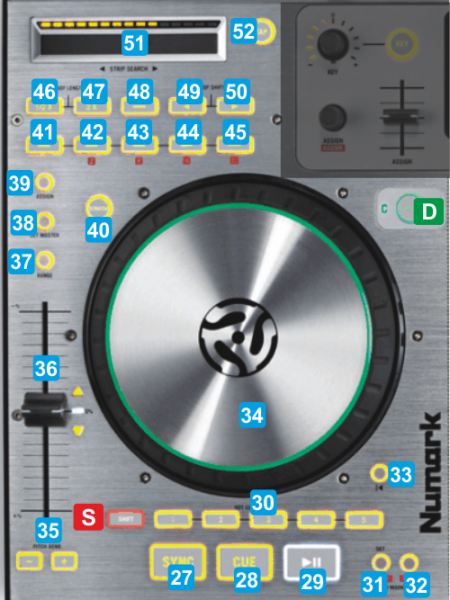
25 KEY ENC
Adjust the Key of the track
26 KEY
Set Key of the track to its original value (reset)


DECK CONTROLS


KEY

ACTION

SHIFT (SECONDARY) ACTION

S SHIFT
Press this button down to access secondary actions as described in the SHIFT ACTION column
D LAYER
Left button : Switch between Decks 1 and 3
Right button : Switch between Decks 2 and 4
27 SYNC
Sync track's BPM and Phase with the ones from the Master Deck
28 CUE
Set a temporary Cue point when paused. Jump to Cue point and stops. Previews from Cue point while pressed
29 PLAY
Play/pause track
Plays track in reverse
30 BUTTONS 1-5
Assign or trigger (if assigned) a Hotcue point 1 to 5
Deletes Hotcue 1 to 5
31 GRID SET
Set Grid Set Mode while pressed.
Set track's current position as First Beat Anchor
32 GRID MOVE
Set Grid Move mode while pressed
Re-analyzes track (undo all Beat grid changes
33 GOTO START
Jumps and stops at the beginning of the track
34 JOG
Touch-sensitive jogwheel for scratch or bend (depending on the Vinyl/Scratch mode)
In Grid Set mode : Adjust the width between grids (equal to set BPM)
In Grid Move mode : Move/shift grids through tracks' s time
35 PITCH BEND
Temporary slow-down/speed-up track's tempo. Tempo will resume to the value designated by the Pitch fader once button is released
36 PITCH
Adjust track's tempo
37 RANGE
Select next available pitch % range for the Pitch fader
38 ASSIGN MASTER
Set deck as Master Deck (will enable Manual mode/selection)
Bring back Auto Master Deck selection
39 ASSIGN
Turn Slip mode on/off
Turn Pitch Lock on/off
40 SCRATCH
Toggle between Vinyl (Scratch) and CD (Bend) mode for the Jogwheel
41 LOOP IN
Set a Loop In (Start) point for a manual loop
42 LOOP OUT
Set a Loop Out (End) point for a manual loop. Exit Loop if loop is enabled
Trigger a 2 beats Auto-Loop
43 LOOP AUTO
turn Loop on/off
Triggers a 8 beats Auto Loop
44 AUTO 1
Triggers a 1 beat Auto-Loop
Triggers a 16 beats Auto Loop
45 AUTO 4
Triggers a 4 beats Auto-Loop
Triggers a 32 beats Auto Loop
46 LOOP /2
Halves the size of the Loop
47 LOOP X2
Doubles the size of the Loop
48 BEATJUMP
Turns Loop Roll mode on/off
49 SHIFT LOOP <
Moves the triggered loop backwards in beats equal to the size of the loop
50 SHIFT LOOP >
Moves the triggered loop forward in beats equal to the size of the loop
51 NEEDLE SEARCH
Fast search through track's time when track is not audible in the Master output
Fast search through track's time
52 TAP
Tap to track's tempo to manually calculate tracks BPM


EFFECTS


KEY

ACTION

SHIFT (SECONDARY) ACTION

53 FX MODE
Switch between Single and Multi FX modes
54 FX MIX BUT
Single FX mode : Turn the selected Effect on/off
Multi FX mode : no action
Single FX mode : Show/hide the FX GUI in the Browser
Multi FX mode : Show/hide the FX GUI of the selected Effects in all FX Slots
55 FX BUT 1
Single FX mode : Enable/disable the 1st Effect button of the selected effect (if available)
Multi FX mode : Turn the selected Effect on/off of FX Slot 1
Single FX mode : same action as the non-shift
Multi FX mode : Select next Effect for FX Slot 1
56 FX BUT 2
Single FX mode : Enable/disable the 2nd Effect button of the selected effect (if available)
Multi FX mode : Turn the selected Effect on/off of FX Slot 2
Single FX mode : same action as the non-shift
Multi FX mode : Select next Effect for FX Slot 2
57 FX BUT 3
Single FX mode : Enable/disable the 3rd Effect button of the selected effect (if available)
Multi FX mode : Turn the selected Effect on/off of FX Slot 3
Single FX mode : same action as the non-shift
Multi FX mode : Select next Effect for FX Slot 3
58 FX MIX
Single FX mode : Select an Effect
Multi FX mode : nothing
Single FX mode : same action as the non-shift
Multi FX mode : nothing
59 FX KNOB 1
Single FX mode : Adjust the 1st Parameter of the selected Effect
Multi FX mode : Adjust the 1st Parameter of the selected Effect in Slot 1
Single FX mode : Adjust the 4th Parameter (if available) of the selected Effect
Multi FX mode : Adjust the 2nd Parameter of the selected Effect in Slot 1
60 FX KNOB 2
Single FX mode : Adjust the 2nd Parameter of the selected Effect
Multi FX mode : Adjust the 1st Parameter of the selected Effect in Slot 2
Single FX mode : Adjust the 5th Parameter (if available) of the selected Effect
Multi FX mode : Adjust the 2nd Parameter of the selected Effect in Slot 2
61 FX KNOB 3
Single FX mode : Adjust the 3rd Parameter of the selected Effect
Multi FX mode : Adjust the 1st Parameter of the selected Effect in Slot 3
Single FX mode : Adjust the 6th Parameter (if available) of the selected Effect
Multi FX mode : Adjust the 2nd Parameter of the selected Effect in Slot 3
62 FILTER BUT
Activate Filter on each deck (when off, the Filter know will not apply on Deck)
The Filter buttons follow the mixer channel order
63 FILTER KNOB
Apply a Low/High Pass Filter to the decks
The Filter buttons follow the mixer channel order


FRONT & REAR PANELS


NAME

DESCRIPTION

64 CF CURVE
Adjust the slope of the crossfader curve (from smooth to cut/scratch)
65 FADER START
turn Fader Start On/off. When enabled, left/right deck will start playback as soon as its Volume fader is moved from the minimum position
66 CF ASSIGN
Assign each Mixer Channel to the Left (A) / Right (B) side of the crossfader or THRU (middle position)
67 HEADPHONES MIX
Blends audio signals in the Headphones channel between the Master Output (when in maximum position) and the Channels that have PFL enabled (when in minimum position)
68 HEADPHONES SPLIT
When turned on, Master Output will be routed to one side of the Headphones and the Mixer Channels that have PFL enabled to the other
69 HEADPHONES GAIN
Adjust the Volume level of the Headphones channel
70 HEADPHONES SOCKET
Connect your headphones using the 1/4" or the 1/8" socket


NAME

DESCRIPTION

71 POWER
Connect the provided AC Adapter. Use the power button to power the unit on, after all connections have been made
72 USB
Connect the unit with your computer via a USB port using the provided USB cable
73 MASTER OUTPUT (XLR)
Master Output (Balanced). Connect your amplifier or amplified speakers using XLR connectors/cables. The Volume of the Master Output is controlled from the top panel
74 MASTER OUTPUT (RCA)
Master Output (Un-balanced). Connect your amplifier or amplified speakers using common RCA connectors/cables. The Volume of the Master Output is controlled from the top panel
75 BOOTH OUTPUT (RCA)
Booth Output (alternative output, mostly used for connecting a dj-monitor)
76 INPUTS
Connect your analogue sources for each Channel mixer. Channels 2 and 3 can take Line/Phono Inputs. Channels 1 and 4 can take Line or Microphone Inputs. Set the switchers to the appropriate position depending on the connected source


For further Technical features and specifications, visit

Numark 4TRAK
Product's Page


Hardware Integration Department
2016 - ATOMIX PRODUCTIONS


Reproduction of this manual in full or in part without written permission from Atomix Productions is prohibited.